5 indispensable sewing tools I had completely underestimated

Ladystitcher Top Tools

When I first thought about learning to sew and make my own clothes, my mother gave me a brilliant present: a new sewing box with lots of useful bits and bobs inside including machine and hand sewing needles, a variety of pins, a spongey pincushion, good fabric scissors, tailor’s chalk (the sort that comes in a hard little square) and a measuring tape. This kit was a great toolbox for a new sewer starting out and I didn’t really think about adding any other implements or accessories for quite some time.

More recently, through reading different sewing blogs and books, I’ve come across suggestions for other sewing tools which I had initially dismissed as not being of particular use to a beginner. There are so many sewing-related gadgets and tools out there that it’s really hard for beginners to figure out what’s worth picking up and what’s an unnecessary expense. I soon discovered that I had really underestimated the usefulness of five of these in particular, and thought I’d share them in case you might be in the same boat in terms of keeping sewing costs down and limiting your sewing gadgetry.

1. Wax for hand sewing

It is almost ridiculous just how useful this has been for me in preventing thread from tangling up while hand sewing waistbands and bindings, or even just quickly basting two pieces of fabric together. A very simple, but very effective, tool for your kit which should be stocked in your local sewing store.

2. A really good marking pen

I used to rely solely on the standard square tailor’s chalk that came in my sewing box gift, but I found it hard to make accurate markings with it because the edges became dull so quickly and yet the chalk wasn’t soft enough to make a nice clear mark.

My husband bought me a chalk pen set at Joanne’s (it’s the red pen above) for Christmas last year. The pen came with a set of over a dozen white and multicoloured replacement nibs as well as a sharpener for replenishing the point. The chalk is good enough quality to mark any of the fabrics I’ve used it on, from wovens through knits, but rubs off really easily and hasn’t left any stains. I can’t tell you how much time and frustration this one pen has saved me!

3. Tailor’s ham

I held off on sourcing one of these for ages, mistakenly believing they were really only useful when inserting sleeves. Nope – the tailor’s ham comes in handy for pressing all sorts of shapes and seams. Pressing seams properly makes such a huge difference to how ‘finished’ a garment looks – and once the item is made up, there’s no going back in there to smooth things out!

Ladystitcher Tools close

4. Bias binding makers

One sewing task I always put off tackling is making matching bias binding. It’s not that hard – just a bit dull! I bought these three Hemline bias binding makers which definitely make the task a lot easier. They’re really not essential for making binding – you can certainly make it just fine using a few pins, a measuring tape and a good iron – but they really speed up the process. The one I use most is the 1″ binding one, but the other two do come in useful.

5. A rotary cutter

I have a really good pair of fabric scissors and so for a long time I thought they would see me through just fine. However, I had a lot of difficulty in trying to cut lighter fabrics with any kind of accuracy using the scissors: the fabric kept slipping and shifting around when lifted for the scissors. I sourced my rotary cutter on eBay and bought a self-healing cutting mat at a local art supply store and have found them particularly useful for cutting knits (so quick and no stretching out of shape!) and very lightweight fabric. And the rotary cutter is especially useful when cutting fabric strips for binding!

So what simple, but brilliantly useful, inexpensive sewing tools do you turn to time and again? What else have I been missing out on all this time??

Coco number seven: In blue

Ladystitcher Coco

This post is a bit shorter than usual – I’ve made this Tilly and the Buttons pattern so many times already that I’ll just keep to what’s different about this one!

I discovered a distinct lack of tops in my handmade wardrobe when participating in Me Made May earlier this year and have been trying to concentrate on sewing more of them. One of the first ones I made to rectify the top-skirt ratio imbalance was a red ponte Coco with a wide collar (I’ve found the pattern piece makes a collar that is very narrow for doubling over). I wore it a lot throughout spring and I’ve really wanted to make another one, so when I spotted some lovely turquoise ponte in The Cloth Shop (Dublin), I bought just enough to squeeze out a three-quarter sleeve Coco with collar.

Ladystitcher blue coco

I wanted this top to be slightly more fitted around the waist than the red ponte one had been, so I brought in the cutting line a bit instead of flaring it out so much. It’s a lovely cosy top and I managed to get one or two wears in before leaving for Shanghai. (Unfortunately in these photos I’m wearing a more-than-usually-padded bra so the fitting looks bit tighter around the bust than usual.)

I bought several McCalls, New Look and Simplicity patterns in online sales before leaving Ireland and now have a few new knit patterns to try out before revisiting Coco for an eighth time, but I don’t see myself going through winter without making one or two more!

Which patterns have become your go-to classics for wardrobe staples? I’m always on the lookout for well-loved patterns I haven’t tried yet!

My Shanghai stash: Shopping at Shi Liu Pu

Ladystitcher Shanghai stash

I brought very little fabric with me to Shanghai, so one of the first things I wanted to do here was to scope out the fabric markets. The more famous of the two biggest fabric sources in Shanghai is the South Bund market, but after some online research, I decided to check out its rival, the quieter and apparently less expensive Shi Liu Pu market, first. Both markets offer made-to-measure tailoring services and sell fabric by the metre.

There seem to be four floors at Shi Liu Pu, including the basement (the place is a bit of a labyrinth). There’s also a large area out the back of the second floor with a wider selection of wool and heavier fabrics. The market has an amazing range of silk, linen and cashmere, and there are several stalls which focus on denim and on jersey/knit fabrics, but there is very little cotton (that I could see).

Ladystitcher Shanghai stash 2

I tried to research prices online to get some idea what I should start from when haggling (I’m a terrible haggler) but the only notes I could find were on a 2011 forum post. So, I’ll include what I paid for the fabric in case anyone out there needs a more recent reference BUT bear in mind that I don’t speak Chinese yet and that really has a big impact on the price.

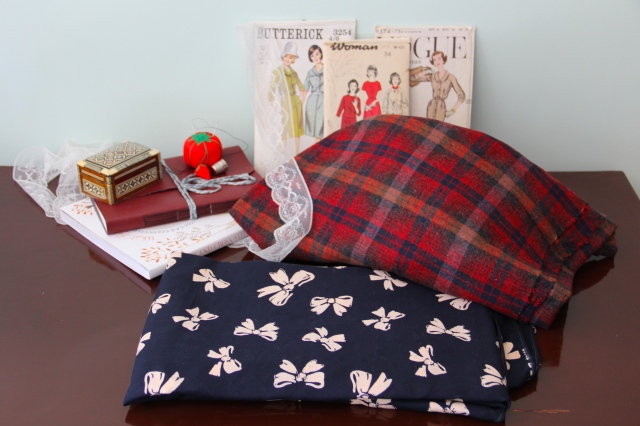
The plaid wool (medium weight, 40 yuan/Eur5 for 1m) shown in the top photo is destined to become a nice warm Delphine skirt, though I’ll have to source some lining first. The bow fabric beside it(2.5m for 80 yuan/Eur10) feels like a soft viscose/cotton blend and has a lovely drape, so could be good for another Myrtle, once I get a printer up and running for the ol’ pdfs.

The red jersey knit and the rose-patterned heavy ponte were each 90 yuan/Eur12 for 2m, and the floral viscose was 50 yuan/Eur6.50 for 3m.

On the one hand, I’m sure the prices will come down when I can actually negotiate in Mandarin and not just via a calculator app, but on the other hand, everything came in much lower than  I expected and at prices I was happy to pay.

I also made a quick trip to the notions market (one thing about shopping here is that so many stores and kiosks seem to be very specialised – so the fabric stalls generally only sold one or two types of fabric, and they didn’t sell any notions. In the notions market, generally the guys who sell zips only sell zips, or the button guys only sell buttons etc). At the notions market, the white lace and the wide black stretch lace in the photos above were each about 5 yuan a metre, and I bought a mixed bunch of a dozen invisible 22″, regular 22″ and short zips for 10 yuan.

To get to the markets:

Shi Liu Pu is on the corner of Dongmen Road and Renmin Road: take the metro to Yuyuan Garden, exit onto Fuyou Road and go east along that street until you hit Renmin Road. Go south on Renmin Road until you get to the junction of it and Dongmen Road (the market is a huge warehouse and it has a big sign on it at that corner with the name in English). It’s a 15-20 minute walk from the metro.

The notions market is on Renmin Lu: metro to Yuyuan Garden, take the exit for Renmin Road and head east along that road (it’s around 388 Renmin Lu, close to South Sichuan Road). It’s a 10 minute walk from the metro.

Moneta II: (Re)covering a botched hem

Taken at the Botanical Gardens, just before we left Dublin

Taken at the Botanical Gardens, just before we left Dublin

I had all kinds of trouble attaching clear elastic to the waistline of my first Moneta. I got some great tips in response to my plea for assistance on tackling clear elastic and recently decided that enough time had elapsed for me to give it another go. I bought this bamboo jersey at Hickey’s in Dublin when I spotted it on sale several weeks ago, and managed to finish up the Moneta before we left for Shanghai. The jersey is quite thin and has a strong tendency to roll up at the edges – which contributed to things going a bit crazy at the hemline…

Moneta 2 bk Ladystitcher

I used a twin needle around the sleeve cuffs and neckline before working on the hem, so luckily those were already finished before disaster struck: the needles kept chewing up the hem and sucking it into the needle plate. I think this was down to a combination of bad fabric management on my part and having the tension a touch off (though it had seemed ok on the neckline!). Then, when I was trying to straighten things out, I hit a pin and shattered the twin needle. Whoops…

So, I managed to make a complete mess of the hem – it was really puckered and the back of the stitching was all kinds of odd. I didn’t want to cut the fabric and lose the length though, so instead I scouted out some lovely stretch lace from a haberdashery in the Powerscourt Centre, A Rubanesque. She didn’t have enough of the lace I’d picked out left in stock, so instead she suggested cutting this really wide one in half, which worked perfectly for making a nice wide band of lace.

Cutting Lace Ladystitcher

I hand stitched the lace on to make sure I moulded it around the skirt without puckering and so that it covered the hem evenly along the bottom. Here’s a closer photo of the lace being stitched on – and the ‘right’ side of the hem pre-lace:

20141002-152333-55413345.jpg

Ooof…

It feels like cheating a bit to basically put a band aid over what is a truly disastrous hem, but I quite like how it turned out! I’m not sure how I could have rescued it otherwise, without cutting up the skirt and re-doing the hem with a new twin needle. As it is, I really like this dress and have already worn it several times. The bamboo jersey is a lovely bright blue and is really, really soft, and the lace adds something a little delicate to what would have been a very simple dress.

Have you ever done an emergency patch-up or patch-over on a sewing project? How did it turn out?

Normal service to resume shortly!

I moved to China a few weeks ago and am having a lot of problems trying to make WordPress work here, but I hope to have resolved those issues soon! I currently only have limited access to the site via my smartphone. I had been using Insta to keep in touch with other sewers, but as of last night the service is unavailable in mainland China (most likely linked to events in Honk Kong) and it’s unclear how permanent that will be. We will be sorting out our internet connection in the coming fortnight so I hope to be back up and running on both sites again soon.

Making Myrtle: Well worth the fiddly bits

Ladystitcher Myrtle

I’m trying to experiment a bit more with sewing different types of fabrics these days, so I was really intrigued to see that the newest release from Colette Patterns – the Myrtle dress – was designed with both knits and wovens in mind.

I actually bought some lovely patterned jersey in London recently to pair with this pattern, but thought I’d give it a first run with a woven. This lovely soft viscose comes from Murphy Sheehy in Dublin (I bought it several months ago but they might have a bit left on the roll). The fabric was so nice to work with – sewing without slipping, ironing easily, draping nicely.

The Myrtle pattern is quite simple, but I did find the shoulder section a bit fiddly. The front piece is self-lined and is basically one long piece folded over at the neckline to make the cowl. When sewing up the bodice seams, you do so with the back bodice piece sandwiched between the other bits.Ladystitcher Myrtle back

The pattern’s sewalong was really helpful, but I still wasn’t quite sure how the back part was supposed to look when lined up for sewing. In the end, I had a bit more back neckline peeping out above the shoulder seam, so I just turned it under and stitched it down afterwards.

Sewing the elastic casing was also a bit fiddly, but am sure I’ll get much quicker (and smoother!) at it with practice, so am planning a few more Myrtles already! I’d really like to make the knit version now, and it could be make for an interesting comparison with the way the woven one comes together.

I was a bit more generous with the length of elastic than the pattern suggests for the waist: the elastic I have is quite sturdy and although there’s great stretch in it, it doesn’t give too easily and I didn’t want to be constricted in an otherwise very comfortable dress.

Have you come across any other lovely knit-and-woven patterns I should check out? Or have you tried Myrtle in a knit fabric?

Owls sweater: My first knitted garment!

Owls Lady Stitcher

I felt really excited about sewing during Me-Made-May but somehow my sewjo has really collapsed in the past fortnight. I think it’s down to a combination of having difficulty finding the right fabric for the projects I want to work on and feeling a tad overwhelmed by all the sewing events I want to take part in, but don’t have time to.

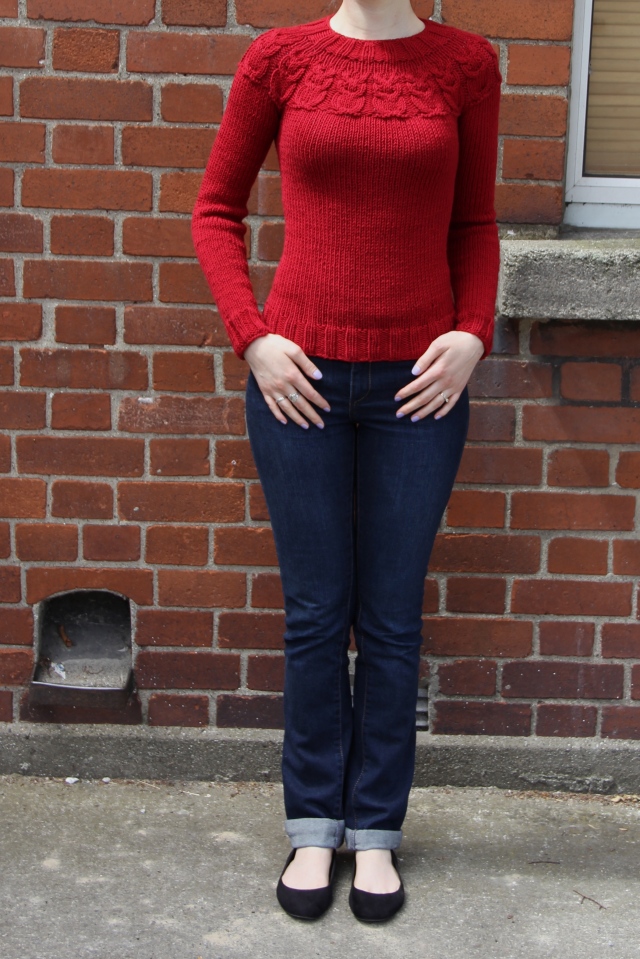
BUT I am happily back into knitting! After some hiccups on that front, I’ve regained knitting confidence through the Owls sweater knit-along organised by Kat of A Krafty Kat and Sabs of Tybalt: King of Cats. I’ve had the Kate Davies pattern on standby for, literally, years but never tried it. Knitting is so much more of a commitment for me than sewing (and it’s much harder to modify the fit as you work) so I think I’ve been unnecessarily cautious about picking knitting patterns to try.

Owls Lady Stitcher Back

The knitalong was perfect for building knitting confidence: Sabs and Kat were great for giving advice throughout the project and the pattern is quite easy to follow. The only real difficulties I encountered were in trying to use the magic loop method to sew the sleeves in the round. I gave it a shot because I couldn’t find the right sized DPNs, but once I got my hands on them, knitting the sleeves was a dream. (I also knit quite tightly and had to cast off three times (!) before the neck opening was wide enough to squeeze my head through.)

I used Debbie Bliss Rialto Chunky in Ruby (bought from This Is Knit in Dublin) and love the colour and softness of this merino wool. It makes for a really cosy – albeit seasonally inappropriate – sweater! I also decided, like fellow knitalonger Charlotte, not to sew on the button eyes as I prefer these little guys without them.

Owls Lady Stitcher Closeup

Buoyed by the success of this, my first finished knitted garment, I’ve already launched into a new project: the Panelled Effect Lady’s Jumper from Jane Waller and Susan Crawford’s book, A Stitch in Time. The pattern requires a bit of concentration but is not so complicated that a novice knitter can’t manage it. I’m using another Debbie Bliss yarn – a 4-ply in a steel grey colour.

Lady Stitcher Panelled Jumper

The McGyver shirt dress: Simplicity Lisette Traveler

Traveler Front

One of my favourite Instagram accounts is that of the American designer behind ‘Poppy von Frohlich‘, who makes beautiful woolen womenswear, ranging from flannel shirts to winter coats. Her pictures really inspired me to finally try my hand at plaid matching, and what better project to start on than a plaid shirt dress?

I’ve been looking out for the perfect shirt dress pattern for some time now – a  design that could be made up into a cosy flannel dress for cooler weather or with more luxurious fabric for a smarter version (like this lovely velvet YSL dress).

Judging from the line drawings on the Simplicity (2246) Lisette Traveler pattern, it looked like it would fit the bill perfectly. It also helps that the pattern has gotten great reviews across a wide range of sewing blogs so there’s a wonderful selection of sewn-up versions to preview online.

Traveler Back Lady Stitcher

Sorry for the wrinkled back view! The only sunny window for taking photos was a few hours after I had put the dress on!

I sourced the brushed cotton from a UK seller on eBay and used it to make the Traveler dress in Version A. This version is supposed to have two lower pockets as well, but I left them off and cut the upper pockets and the plackets on the bias to shake up the plaid pattern. Matching that plaid takes a lot of effort! Hats off to all those people who’ve made several plaid Archers! Despite all my efforts, I didn’t quite match it across the side seams, but I’m happy with how well the front panels, plackets and pockets worked out. I made matching buttons out of one of those ‘self-cover’ button sets.

I have quite narrow shoulders and I think this falls just a little too wide for my shape. It would certainly fit better if I buttoned it right up to the top, but I’m not really comfortable wearing this style like that so I’ll just get on with it being the way it is! I’ll definitely measure the shoulders on the pattern pieces before trying version C, which is the next one I’d like to make from this pattern.

So, the McGyver connection. Well, when I was a child, that show was basically our ‘family viewing’ time. I hadn’t seen it since I was really young and didn’t really remember much about, so when I came across the first episode of it by accident recently, I had to check it out! It turns out that while I didn’t retain any of the storylines or general information about the McGyver character, his wardrobe has had an unconscious influence on me after all these years:

His Shirt

Nice plaid matching, McG.


Me-Made-May’14: Second and final round-up

Lady Stitcher MMM

Day 16: Colette Truffle | Day 17: Sew For Victory blouse, blue remnant skirt (unblogged) | Day 18: Coco top (unblogged), RTW skirt | Day 19: Colette Moneta | Day 20: Coco top, Beignet skirt

(The first half of my MMM’14 round-up is online here)

Well, the month-long project that was Me-Made-May has come to an end! I enjoyed it much more than I had expected, and made some interesting realisations about my sewing which will really direct how and what I work on over the next few months.

The first, and probably most important, thing I’ve realised is how much I really enjoy the clothes I’ve made. In one way, this encourages me to keep sewing, but in another, it makes me feel I should slow my pace a little and take more time over the process.

I didn’t start sewing because I wanted a major wardrobe expansion. While I really want to sew and to learn more techniques, I still don’t want to amass loads of ‘stuff’. So, to balance things out, I’ll be phasing out my RTW wardrobe (I’ve had most of it for several years and it’s really showing that wear) with things I’ve made.

Lady Stitcher MMM2

Day 21: Moneta, collar crocheted by my sister | Day 22: Vintage Pledge shirt dress, RTW jumper | Day 23: Simplicity 1913 (unblogged) and RTW shirt, sweater | Day 24: Simplicity Lisette Traveler flannel dress (unblogged) | Day 25: Coco top, Foxy Delphine skirt

Which brings me to the second point I realised over MMM: the range of garments I was able to draw on over the month. I actually hadn’t realised how much I’ve sewn over the past seven or eight months since I started this blog, but my sewing has been focused ona very limited range of garment types. I’m not a whizz with the machine – apart from Tilly’s Coco pattern I’m really not that quick at making things. What I really need to do is to consider the type of project I work on: when I started sewing, I had very few skirts and because they’re so simple to make and to fit, I’ve concentrated on making them above other types of clothing! As a result, I have a lot of skirts and very few tops!

I’m trying to rectify these issues by 1. focusing on finishing techniques (like embroidery) and 2. making more tops and dresses.

Lady Stitcher MMM Last Days

Day 26: Mabel skirt, seed stitch scarf, RTW vest, cardigan | Day 27: Grey Coco | Day 28: Moneta dress | Day 29: Hazel dress | Day 30: Truffle dress | Day 31: Foxy Delphine, RTW vest, cardigan

When I started MMM, I thought I’d soon make my first pair of trousers, but I still haven’t found the right material. The downside of buying fabric online is the risk involved – either you take a chance and order something based on the photo and description, or you order swatches. Sometimes, by the time the swatches have arrived, the fabric has sold out! So I’m still keeping an eye out for trouser fabric, but I don’t think I’ll be making them any time soon.

One thing I really won’t miss from this month is taking photos of myself! I spend a lot of time at home and our house has very poor natural lighting, plus we don’t have any mirrors you can actually see the whole of yourself in, so taking photos was the biggest challenge! I did, though, really enjoy seeing what MMM outfits everyone was posting to Instagram and I found some brilliant blogs through it.

What areas of sewing are you concentrating on for the moment? Did MMM help you re-focus your sewing or knitting?

Foxy Delphine: Love at First Stitch skirt

IMG_2220

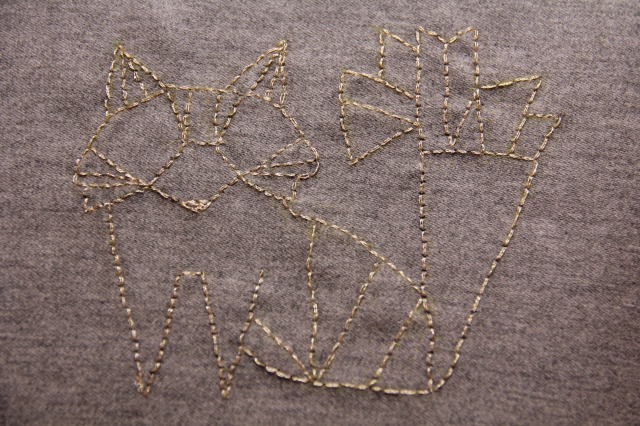
The lil’ fox is incredibly difficult to photograph in my poor-lit house, but the gold thread is much more noticeable in real life.

While making my grey Colette Truffle dress recently, I began thinking about different ways to embellish garments to add a special, personal touch. I love that the Truffle has a simple style as it makes it really easy to accessorize for different situations – it’s a very handy go-to dress to have in the wardrobe – but I was also itching to add something more permanent to it to spice it up a bit.

Around that time, Ingrid of We The Sewing posted about embellishing clothing with embroidery. On reading her tips, I knew that this was exactly the technique I wanted to try out.

So when Tilly Walnes released a preview of the lovely projects included in her new book, Love at First Stitch, I immediately thought of making a simple grey Delphine and trying some hand embroidery. Happily, I still had some of the soft suiting fabric I’ve used on my Frankenskirt and Truffle dress, and I traced out the Delphine pattern as soon as I got my hands on the book.

Lady Stitcher Foxy Delphine Prep

I pinned a sketch of the fox to the skirt in different places to check the position I wanted before tracing it on to the fabric.

This is my first time embroidering anything on clothes and I followed Ingrid’s great tips for planning the project, from sourcing a simple line drawing via Pinterest (this fox), to tracing the pattern onto the fabric using a wheel and dressmaker’s tracing paper. Initially, I planned to stitch a bright blue or neon pink animal character onto the skirt, but when I was looking through the skein selections at the beautiful haberdasher A Rubanesque, I discovered some amazing metallic DMC threads and decided that gold (shade: E677) would be perfect for this project.

I used an embroidery hoop to keep the skirt fabric tight enough to stitch without puckering, but clamped it loose enough not to crush and mark the fabric. I divided the skein into two-strand threads for sewing because one strand was too light and I was worried that three would tangle. I should note that this metallic thread was more liable to split and fray during sewing so I found it easier to work with shorter lengths, and I just used backstitch.

Here’s a close-up of the finished fox. He’s imperfect, but I like him:

Fox Finished Lady Stitcher

I’m really happy with how this first foray into embroidery embellishment worked out. I like the simplicity of Delphine’s design and the subtle shine of the little golden fox against the soft grey fabric. There’s a stronger contrast between the yellow of the thread and the skirt fabric in real life than in these photos, and the fox sparkles a little when the light catches him.

I also managed to get the invisible zip in really smoothly using my regular zipper foot (yes, I’m done with that pop-on invisible zipper foot!). The Delphine is a lovely simple skirt to sew and, as with all the projects in her book, Tilly includes a range of simple but inspiring ideas for customising your skirt.

IMG_2242

I already have two excellent sewing books for learning new techniques, The Colette Sewing Handbook and The Complete Photo Guide to Garment Construction by Christine Haynes (I think Tilly’s book sits somewhere between the two) but I was really drawn to the patterns included in Love at First Stitch. I’m currently working on a Clemence skirt with fabric from my stash and hope to try my hand at the Mimi blouse soon too.

I won’t go into outlining the new book at length as there are already plenty of reviews out there from its blog tour (House of Pinheiro has compiled a particularly good overview), but I do think it’s brilliant value for five lovely and very wearable patterns, as well as being a handy sewing guide. There’s no harm in having more than one reference when you need sewing advice in a pinch – sometimes the different descriptions can help something click better.

A second sewing book I bought recently was a beautiful guide to cross stitch by Sophie Simpson called Storyland Cross Stitch – so I might be trying some cross stitch on clothing soon too!

Have you tried any new clothing embellishment techniques? How did they turn out?