Coco number seven: In blue

Ladystitcher Coco

This post is a bit shorter than usual – I’ve made this Tilly and the Buttons pattern so many times already that I’ll just keep to what’s different about this one!

I discovered a distinct lack of tops in my handmade wardrobe when participating in Me Made May earlier this year and have been trying to concentrate on sewing more of them. One of the first ones I made to rectify the top-skirt ratio imbalance was a red ponte Coco with a wide collar (I’ve found the pattern piece makes a collar that is very narrow for doubling over). I wore it a lot throughout spring and I’ve really wanted to make another one, so when I spotted some lovely turquoise ponte in The Cloth Shop (Dublin), I bought just enough to squeeze out a three-quarter sleeve Coco with collar.

Ladystitcher blue coco

I wanted this top to be slightly more fitted around the waist than the red ponte one had been, so I brought in the cutting line a bit instead of flaring it out so much. It’s a lovely cosy top and I managed to get one or two wears in before leaving for Shanghai. (Unfortunately in these photos I’m wearing a more-than-usually-padded bra so the fitting looks bit tighter around the bust than usual.)

I bought several McCalls, New Look and Simplicity patterns in online sales before leaving Ireland and now have a few new knit patterns to try out before revisiting Coco for an eighth time, but I don’t see myself going through winter without making one or two more!

Which patterns have become your go-to classics for wardrobe staples? I’m always on the lookout for well-loved patterns I haven’t tried yet!

Foxy Delphine: Love at First Stitch skirt

IMG_2220

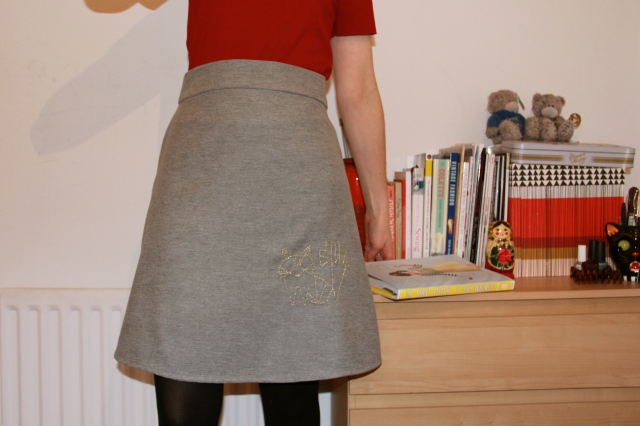
The lil’ fox is incredibly difficult to photograph in my poor-lit house, but the gold thread is much more noticeable in real life.

While making my grey Colette Truffle dress recently, I began thinking about different ways to embellish garments to add a special, personal touch. I love that the Truffle has a simple style as it makes it really easy to accessorize for different situations – it’s a very handy go-to dress to have in the wardrobe – but I was also itching to add something more permanent to it to spice it up a bit.

Around that time, Ingrid of We The Sewing posted about embellishing clothing with embroidery. On reading her tips, I knew that this was exactly the technique I wanted to try out.

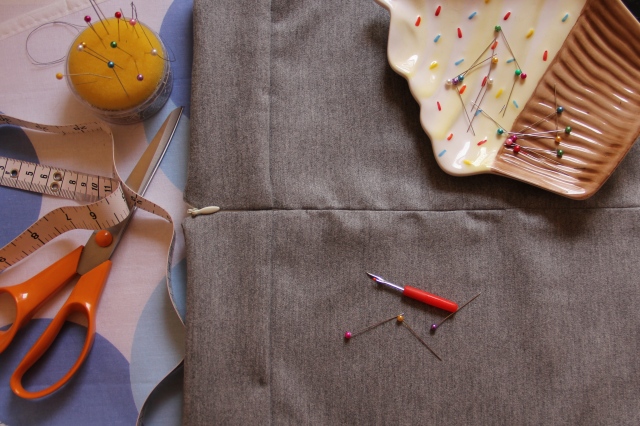
So when Tilly Walnes released a preview of the lovely projects included in her new book, Love at First Stitch, I immediately thought of making a simple grey Delphine and trying some hand embroidery. Happily, I still had some of the soft suiting fabric I’ve used on my Frankenskirt and Truffle dress, and I traced out the Delphine pattern as soon as I got my hands on the book.

Lady Stitcher Foxy Delphine Prep

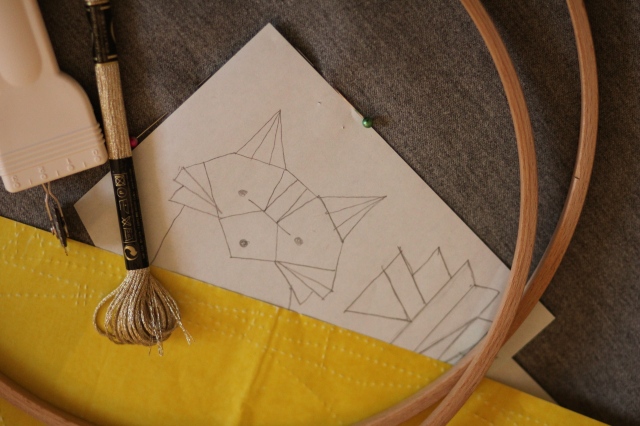
I pinned a sketch of the fox to the skirt in different places to check the position I wanted before tracing it on to the fabric.

This is my first time embroidering anything on clothes and I followed Ingrid’s great tips for planning the project, from sourcing a simple line drawing via Pinterest (this fox), to tracing the pattern onto the fabric using a wheel and dressmaker’s tracing paper. Initially, I planned to stitch a bright blue or neon pink animal character onto the skirt, but when I was looking through the skein selections at the beautiful haberdasher A Rubanesque, I discovered some amazing metallic DMC threads and decided that gold (shade: E677) would be perfect for this project.

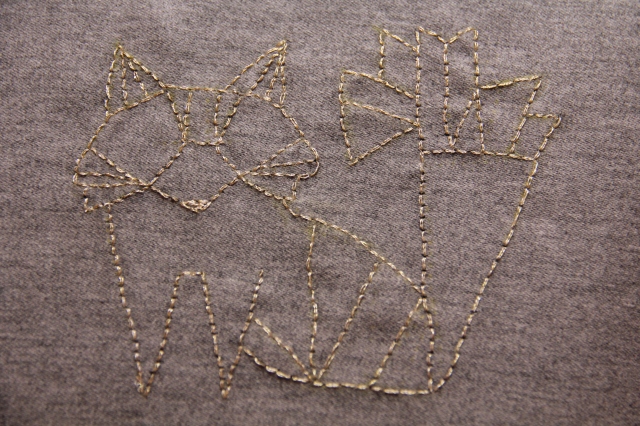
I used an embroidery hoop to keep the skirt fabric tight enough to stitch without puckering, but clamped it loose enough not to crush and mark the fabric. I divided the skein into two-strand threads for sewing because one strand was too light and I was worried that three would tangle. I should note that this metallic thread was more liable to split and fray during sewing so I found it easier to work with shorter lengths, and I just used backstitch.

Here’s a close-up of the finished fox. He’s imperfect, but I like him:

Fox Finished Lady Stitcher

I’m really happy with how this first foray into embroidery embellishment worked out. I like the simplicity of Delphine’s design and the subtle shine of the little golden fox against the soft grey fabric. There’s a stronger contrast between the yellow of the thread and the skirt fabric in real life than in these photos, and the fox sparkles a little when the light catches him.

I also managed to get the invisible zip in really smoothly using my regular zipper foot (yes, I’m done with that pop-on invisible zipper foot!). The Delphine is a lovely simple skirt to sew and, as with all the projects in her book, Tilly includes a range of simple but inspiring ideas for customising your skirt.

IMG_2242

I already have two excellent sewing books for learning new techniques, The Colette Sewing Handbook and The Complete Photo Guide to Garment Construction by Christine Haynes (I think Tilly’s book sits somewhere between the two) but I was really drawn to the patterns included in Love at First Stitch. I’m currently working on a Clemence skirt with fabric from my stash and hope to try my hand at the Mimi blouse soon too.

I won’t go into outlining the new book at length as there are already plenty of reviews out there from its blog tour (House of Pinheiro has compiled a particularly good overview), but I do think it’s brilliant value for five lovely and very wearable patterns, as well as being a handy sewing guide. There’s no harm in having more than one reference when you need sewing advice in a pinch – sometimes the different descriptions can help something click better.

A second sewing book I bought recently was a beautiful guide to cross stitch by Sophie Simpson called Storyland Cross Stitch – so I might be trying some cross stitch on clothing soon too!

Have you tried any new clothing embellishment techniques? How did they turn out?

Coco #5: Rough around the edges

Coco 5

I’ve had the idea for this colourblock Coco in my head for a while, but didn’t have enough knit fabric left after my last versions to cobble it together. Luckily, while searching for twin needles in Dublin last week, I came across this lovely burgundy ponte on sale in Hickey’s (I’m linking to them in case anyone wants their contact details – their website is devoid of stock info).

The grey fabric is the same used in one, two, three of my earlier Cocos and I had actually cut out these pockets for the first Coco dress I made, but was a bit worried that they made it too busy so put them aside for later.

Coco 5 back

I wanted to keep this dress a little bit raw-looking and not too polished, so instead of turning in the sides of the pockets for a smooth finish when sewing them on to the dress, I left the edges unfinished and just sewed them straight on (though they look quite camouflaged in these photos!). Having worked with this grey knit before (and having worn those versions a lot since making them!), I know it’s not prone to unraveling or curling. I left the armhole edges unfinished for the same reason.

Coco 5 pocket

Coco 5 shoulder

I love each one of the five Cocos I’ve made so far, both dresses and tops, but I think it’s time to step away from this pattern for a while and move on to new knit challenges! I’m really looking forward to trying out the new Colette Patterns releases next.

I already have a red rib knit on hand to trial-run the Moneta dress and I have enough of this burgundy ponte left to make a Mabel skirt – I just need to source those twin needles!

What new sewing challenges or patterns are you looking forward to trying?

Cats and Cocos: Stress-free sewing

Mousey

I had some dental surgery last week which has laid me low for a while. I  haven’t been up to tackling any big or tricky projects post-surgery, but last weekend I wanted to sew something – something simple. So, I turned to two of my favourite things: cats and Cocos.

The first project I worked on was a sweet stuffed toy for the cat. Working from Creative Pixie’s handy mouse-making tutorial, I used some fabric left over from my Murphy dress for the body and cut the mouse ears from the same grey knit as my first Coco. I also inserted a bell from a Lindt chocolate Santa and some dried catnip along with the mouse stuffing to spice it up a bit for her, then secured a string tail. The stuffing also came from leftovers – I had used it for the needle case I made at Christmas.

Our cat is pretty tough on toys so I’m not sure how long this little creature will last! It was really quick to make though, so won’t be too hard to whip up a few more when the time comes. Plus, it’s a handy use of fabric scraps – and she’s certainly been enjoying it.

Cue a cat-smushing-toy-in-face photo:

Cat Face

Cat Heart Mouse

And then for a bit of selfish sewing… I’ve had a lovely soft, very lightweight, polka dot jersey on standby for a while. I found a yard of it in a remnant bin for a few euros and thought that one day, I’d get around to making some kind of pyjama top out of it. Well I forgot all about that until I saw Stitch and Witter’s cosy bedtime Coco and remembered that I had squirreled this fabric away.

The polka dot knit (it’s an off-white base with grey dots) is very lightweight so I made the yoke and short sleeves out of some of the leftover red fabric from my sporty Coco to preserve some modesty.

Night Coco Front

This is one soft pyjama t-shirt! I’ve been holding off on wearing it since making it on Sunday so I could photograph it and now I can’t wait to snuggle into it! I like the way the unfinished sleeve and bodice ends suit the softness and casual feel of the top, so I’ve left them unfinished.

What do you turn to when you want to do something craft-related, but don’t want to commit to a big project?

Coco the third: Finally adding pockets

Coco Yella n Grey(Note: Additional photo added on 21 April 2014)

After hitting some serious snags in a project I’m working on for A Sewing Odyssey’s vintage pattern pledge, I took a bit of a break from it this week to clear my head and do some stress-free sewing.

I’ll keep this post brief because I’ve already written twice recently about using this lovely pattern from Tilly and the Buttons: first, I made a grey long-sleeve roll-neck dress, then I had a go at hacking the pattern to make a sporty, casual, colour-blocked top.

Even after both of those projects, I still had some of the grey fabric, which I bought specifically for Coco, left over. A couple of weeks ago, I spotted this lovely gold ponte on Guthrie and Ghani’s website and thought it would make a nice contrast against the grey. I also wanted to finally have a go at making a Coco which incorporated pockets!

I’m not a particularly quick sewer, but this pattern is so speedy to make up that I was able to put this dress together completely before lunch on Wednesday (unusually speedy for me!). The pattern is also simple enough to allow multiple adaptations (check out Tilly’s Pinterest board of Cocos for some brilliantly creative examples, like House of Pinheiro’s second Coco).

So, are you all set for Friday’s Coco party?! 🙂 (My party track pick is ‘Shout’ by the Shangri-Las.)

Coco 3 Front View

Coco 3 Back View

Coco Selfie

Sporty Coco: A second run at sewing knits

Sporty Coco Back

I absolutely loved working with the Coco pattern by Tilly and the Buttons when making the roll-neck dress version recently and I couldn’t wait to try making a top with it. I found it quite difficult to find suitable knit fabrics in Dublin, but last week I came across a lovely bright red double knit in The Cloth Shop, where I bought the grey knit for my Coco dress. It’s considerably lighter in weight than the grey fabric, but has only 2% stretch.

I had a good bit of the grey knit left over from Coco #1 and thought it would work as a more stable and contrasting fabric alongside this bright red knit in a colourblocked Coco. So, I used the heavier material as a yoke and shoulders and used the lighter stuff to finish the front, back and sleeve lengths.

There was a lot of guesswork involved in figuring out how long I wanted the yoke, or how much of the grey I wanted in the sleeves, so cutting the fabric involved a lot of procrastination! (Happily, Tilly has since posted a handy tutorial online for making a contrast yoke Coco.) I was worried about where the seamline would sit on the bust and how that might affect the way it sits. I was also uncertain about how to match up the grey part of the sleeves with the front and back, but think I’ve figured that out now (learning by doing!).

Sporty Coco Front

It’s the most sporty item I’ve ever sewn (and I think it went a bit Star Trek with the colours I chose…) but I like the fit and it’s so soft and comfortable to wear! I’ll wear it a couple of times to check the fit, but I might just take in the upper sleeves slightly as they’re a tad loose. Interestingly, I didn’t have any sleeve issues with my grey Coco dress, though I have read other bloggers finding them too loose (might be something to do with the weight of the grey fabric?). I had planned to put some cute contrast heart pockets on, but thought better of it after handling the fabric a bit more – I think the red would sag under pockets.

Planning Cocos

I had been putting off sewing knits and jerseys because I don’t have a serger, but I think this pattern has given me the confidence to try my hand at other jersey fabrics and patterns, like this cute dress by Salme (who are having something of a sale at the moment) or the much-blogged Renfrew by Sewaholic.

And speaking of sewing knits, have you seen that Colette Patterns is bringing out a book dedicated to the topic AND new patterns for knits? If you subscribe to their book/pattern announcement list here by 8 April, they’ll send you a free chapter of the book before its release.

Skills learned: Working with knits; mixing fabrics.

Recommend pattern?: Definitely! It’s a very satisfying simple pattern and having made both the dress and the top options, I can officially say I’m hooked on (a) this pattern and (b) sewing with this kind of fabric.

Crazy for Coco: Learning to sew with knits

Coco cat front

Tilly Walnes’s new pattern, Coco, came out just as I was wondering how best to tackle sewing with knit fabrics. I’ve sewn a wool skirt, but have stayed away from any kind of wool or cotton blend that involved a bit of stretch because I wasn’t really sure how to approach it. When I saw Coco’s release this week, I knew I’d found a good place to start.

At first look, the pattern appeared both approachable and simple (there are only three main pattern pieces to the top or dress: sleeve, front bodice and back bodice). Plus, the core versions outlined by Tilly are all lovely simple silhouettes and really wearable. Having used the pattern, I can now confirm that it is a simple one and a brilliant introduction to sewing knits.

I already had ball-point needles to hand, but had no knit fabrics in my stash, so I scoured the main fabric shops in Dublin city centre to see what my options were. The most suitable fabrics I found were in the lovely The Cloth Shop, but the only colour options were cream/beige, deep brown and steel grey. Nude and brown shades aren’t really my thing, so I took a chance on the grey, although I suspect it’s a tad heavier and stretchier than the pattern calls for. It is, though, fantastically soft to touch – if I could afford to go back and buy the rest of the roll, I would!

Image

Coco and casual-photo-bombing cat

Initially, I had my eye on making up the shorter version with cuffed sleeves and roll neck (it’s so fantastically 60s!), but, on consideration, thought that this fabric would be more suited to the dress. I’ve omitted the pockets though because they just didn’t look quite right on me, but I would love to have a go at putting a strongly contrasting colour like a golden yellow or neon pink against this grey. There’s not much chance of finding either of those colours in the shops here though so I think I’ll be ordering some fabric samples from the suggested stockists on Tilly’s site for my future Cocos.

I bought the pdf version of the pattern and the instructions are very simple, methodical and clear (Tilly is planning to post detailed instructions soon on her site to coincide with a forthcoming Coco sew-along). I did also use Sewaholic’s Renfrew tutorial for more detail on stabilising the shoulder seams and found that really helpful.

I’m really pleased with how easy it was to make this dress, and it’s lovely and cosy to wear. I don’t have a serger, so made it all on my regular Janome sewing machine. Once I’ve sourced some other lovely knits, I’ll get stuck into making a few of the top versions, with and without the funnel roll neck!

(Speaking of the roll neck, here’s how it looks standing up before it’s rolled down over the neck seamline:)

Image